Лайвхак для успешного старта в игре Anno 1404
Доброго времени суток дорогие читатели. Сегодня я расскажу вам несколько лайвхаков которые помогут вам на старте в Anno 1404.
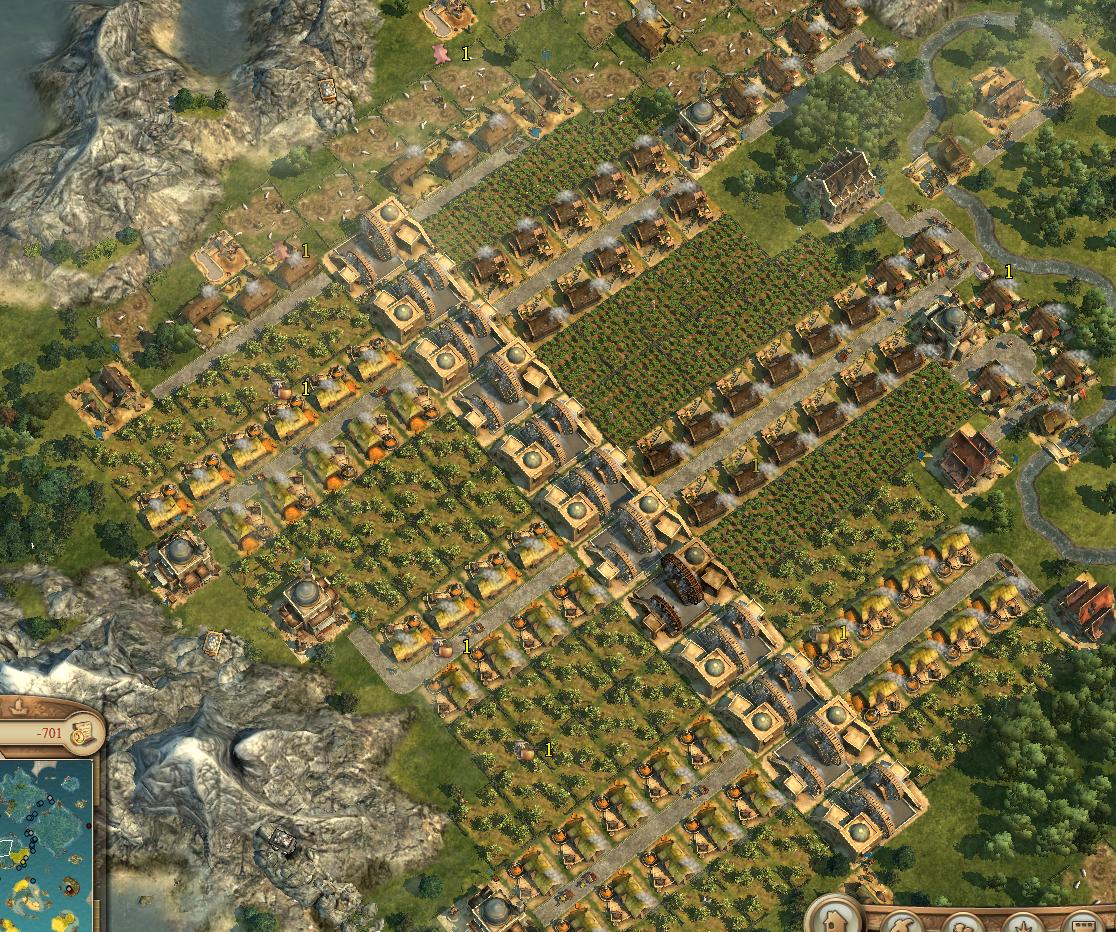
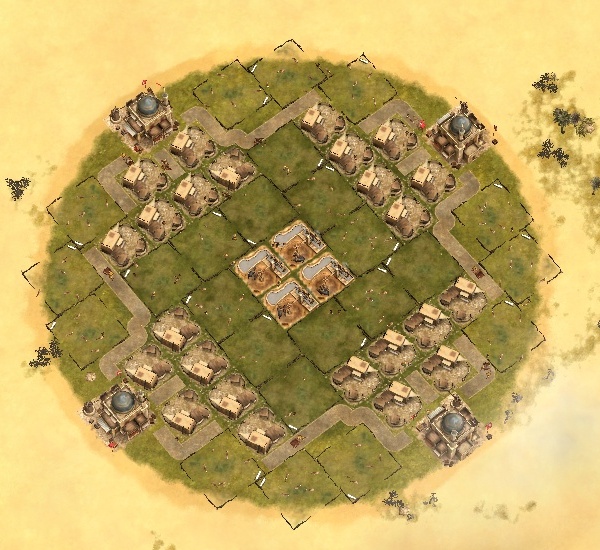
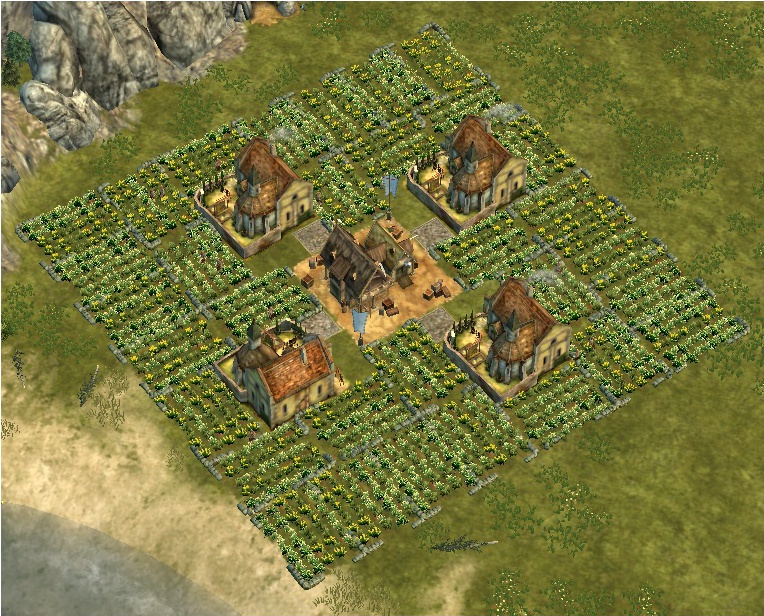
В самом начале вы появляетесь у острова Лорда Ричерда. Сразу скупаем у него все ресурсы которые имеются в продаже и выбираем самый большой остров на карте. Если изначально ваша карта закрыта, то исследуйте её максимально быстро в поисках самого большого острова. Не обращайте внимания на то какие плодородия есть на острове, так как на нём выращиваться ничего не будет. Самый большой остров будет только под застройку. Эта будет ваша столица, где будет жить основное население вашего государства.
Теперь покупаем подарок у Ричарда для Аль Захира и плывём с ним к нему. Он нам даёт корабль и возможность строить восточные строения. Выбираем максимально близкий к нашему острову, остров с финиками и пряностями, располагаемся там и начинаем максимально быстро добывать пряности и отправлять их на основной остров. Тоже самое делаем и с другими ресурсами которые необходимы для населения.
Мы просто захватываем все ближайшие острова и выращиваем там всё то, в чём нуждается наш народ на основном острове. За репутацию мы набираем кораблей у Ричард.
После того как мы наладили логистику, наша задача начать добыть как можно больше денег. Делаем это следующим образом:
Все ваши корабли будут иметь излишки тех продуктов которые они перевозят. Наша задача построить торговый путь так, что бы ресурсы сначала плыли в столицу, а после плыли на острова других игроков и продавали излишки там. Таким образом производство не будет останавливаться, в столице всегда будет всё что надо народу, а остатки будут продаваться.
Первые пару часов мы играем без войны, пиратам платим за мир, с другими игроками налаживаем отношения при помощи денег комплиментов. Если вы начнёте воевать, то вся ваша экономика будет под угрозой. Если один из ваших торговых путей будет атакован и вы не сможете его защитить, то вы это почувствуете очень скоро и это на прямую будет касаться ваших денег и не только.
На каждом из ваших островов всегда будут излишки ресурсов которые надо куда то девать. Наша задача выставить на продажу тот ресурс который добывается на острове. Если добывается много ресурсов, то выставляем на продажу то, что производится из сырья. Таким образом вы постоянно будете получать не плохой пассивный доход со всех островов и возможно вы будете в плюсе по деньгам, в то время когда населения не приносит достаточно денег и месячные налоги у вас находятся в минусе.
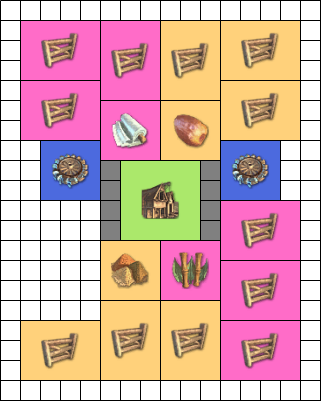
Building layout strategies
This page gives examples of efficient layouts for houses and production facilities so the flow of goods is fast and space is conserved.
Contents
Housing [ edit | edit source ]
League of Ungentlemanly Warfare’s Occidental Layout [ edit | edit source ]
Additionally, if not playing with Fires, Disease, Wear, or Spies; the Carpenter’s Hut, Surgeon, Base of operations, and Fire House can all be replaced with standard houses. The Alms house can also be changed to housing if not required.


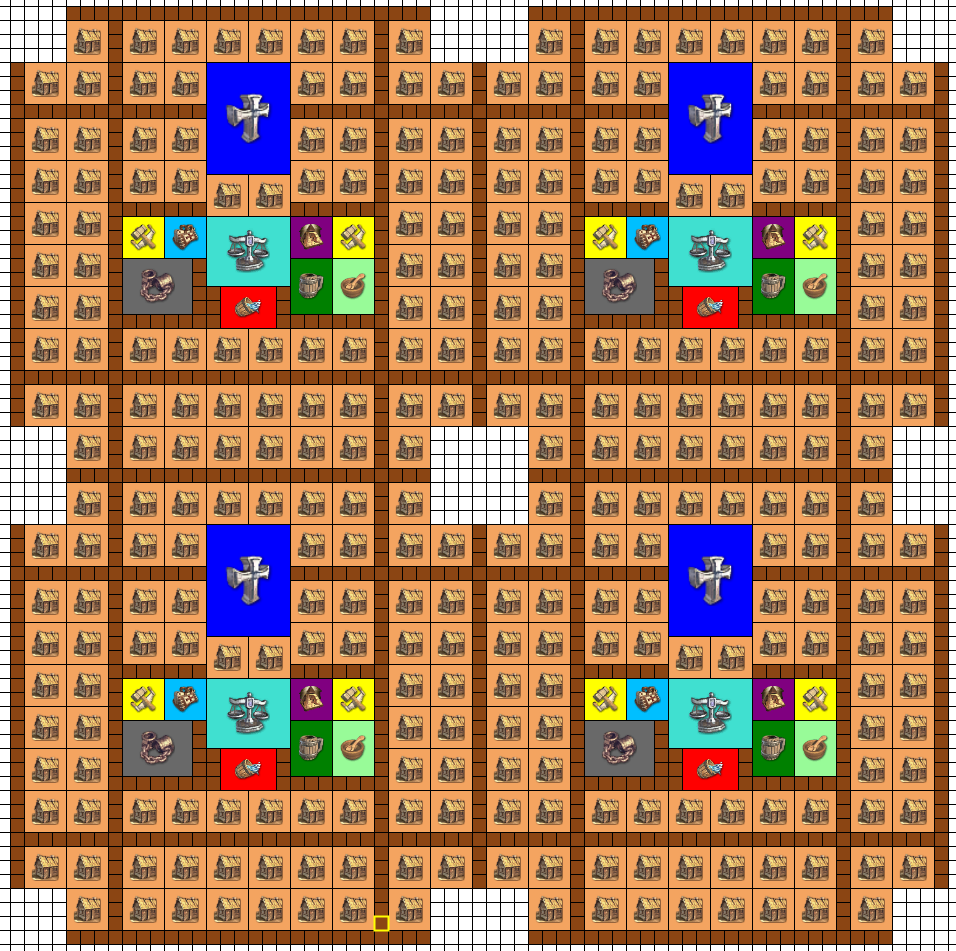
Large scale occidental layout [ edit | edit source ]
Big City building plan

Building plan with calamity buildings
Preparing for «Need-Buildings»
The first image shows the outcome, if you are playing without the need for Carpenters, Fire Stations and Surgeries.
The second image shows where to place calamity buildings (Carpenters, Fire Stations and Surgeries) if you set up game for them. This will «cost» you 9 Houses per Market Building.
The third image shows how to prepare for the «Need Buildings»: Build the houses in this way, so (later on) to easily make place for the Tavern, Church and Prison.
In the first image the center is left open. This is best filled with a Market Building. An additional Market Place can be build here, but houses built around it will be out of the influence areas of the «Need Buildings». You could make a beautiful garden here, as well.
4 Market Place ·
340 Houses ·
16 Chapels ·
4 Church ·
12 Taverns ·
4 Prisons
Small versatile occidental layout [ edit | edit source ]
Layout with patricians

Layout with noblemen

Nearly every house has access to all the service-buildings. Only the left-most column doesn’t have access to the tavern and the middle-two houses next to the marketplace aren’t protected by the Spy houses.
The colors represent the ratios of promotions (grey = peasant, green = citizen, red = patrician, pink = nobleman).
Alms house can easily be added above the left-most fire station by replacing the house and the three roads above.
Chapels can be built on the location of the Church and the Prison.
Layout can be scaled in all directions.
1 Marketplace · 100 houses · 1 church · 3 carpenter’s house · 2 fire stations · 4 bases of operation · 1 tavern · 1 debtor’s prison · (2 surgeries) · 4 small market buildings
Small scale occidental layout [ edit | edit source ]

For protection against sickness and plague and fire, additional houses must be demolished to make space for such facilities.
1 Marketplace · 87 houses · 4 chapels · 4 carpenter’s house · 2 taverns · 1 debtor’s prison · 1 church
Occidental layout I [ edit | edit source ]
Second Image shows where to put Fire Stations, if you want them. Doesn’t support the 3 Houses at top or bottom.
1 Marketplace · 101 Houses · 1 Church · 1 Tavern · 1 Debtor’s prison · 4 Carpenter’s houses · 2 Surgeries · 1 Small market building
Occidental layout II [ edit | edit source ]
Alms houses can be built instead of a house at the edge of the city.
2 Marketplaces · 152 + 4 Houses · 1 Chapel · 1 Tavern · 4 Carpenter’s house · 4 Surgeries · 1 Debtor’s prison · 1 Church ·
Oriental layout [ edit | edit source ]
1 Bazaar · 108 Houses · 1 Mosque · 1 Bath house
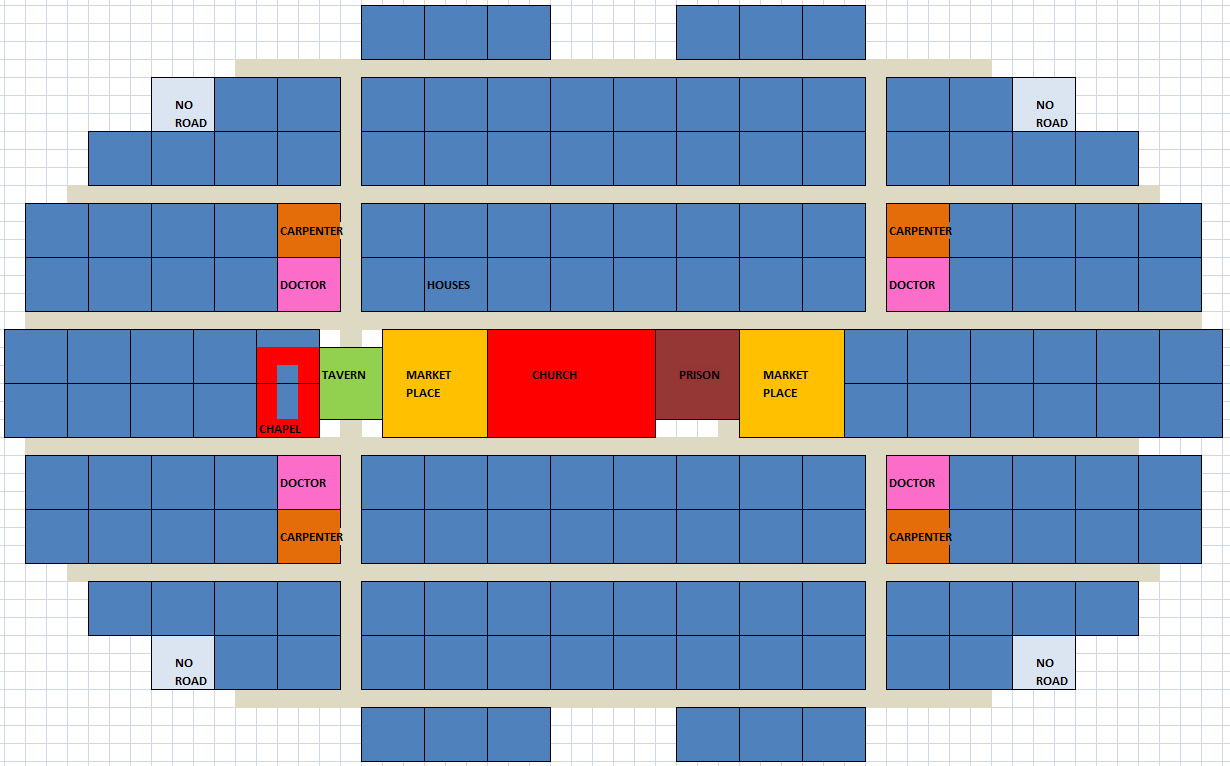
Imperial Cathedral with houses I [ edit | edit source ]
Imperial Cathedral with 334 houses
1 Imperial Cathedral · 334 houses
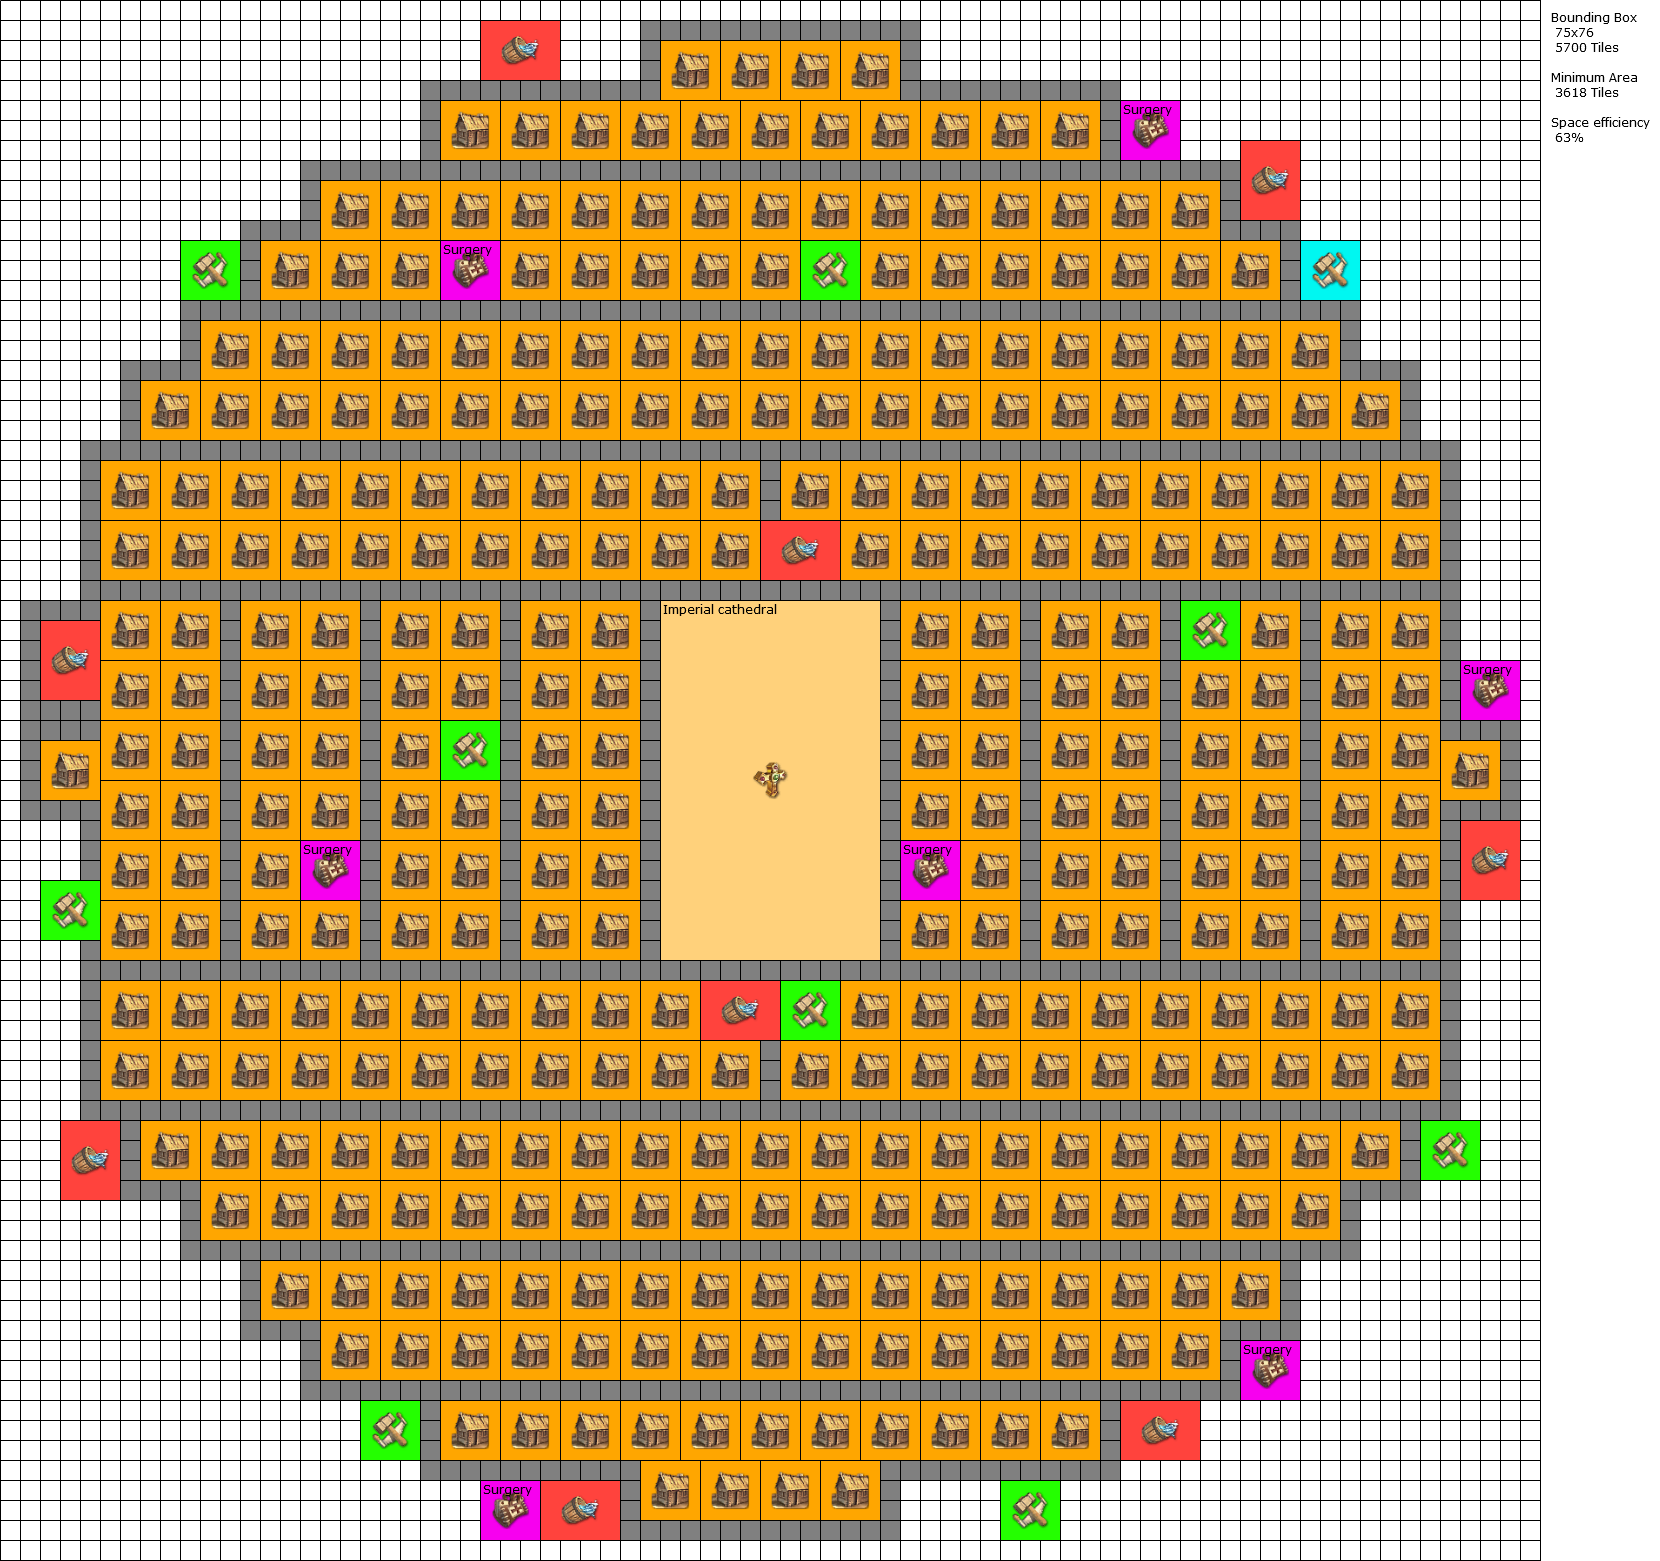
Imperial Cathedral with houses II [ edit | edit source ]
Imperial Cathedral with 342 houses, and a straight design.


Ctrl and scroll to zoom

1 Imperial Cathedral · 342 houses
Imperial Cathedral with houses III [ edit | edit source ]
In this picture 6 houses are replaced with Base of Operations. These 6 can cover the whole area.
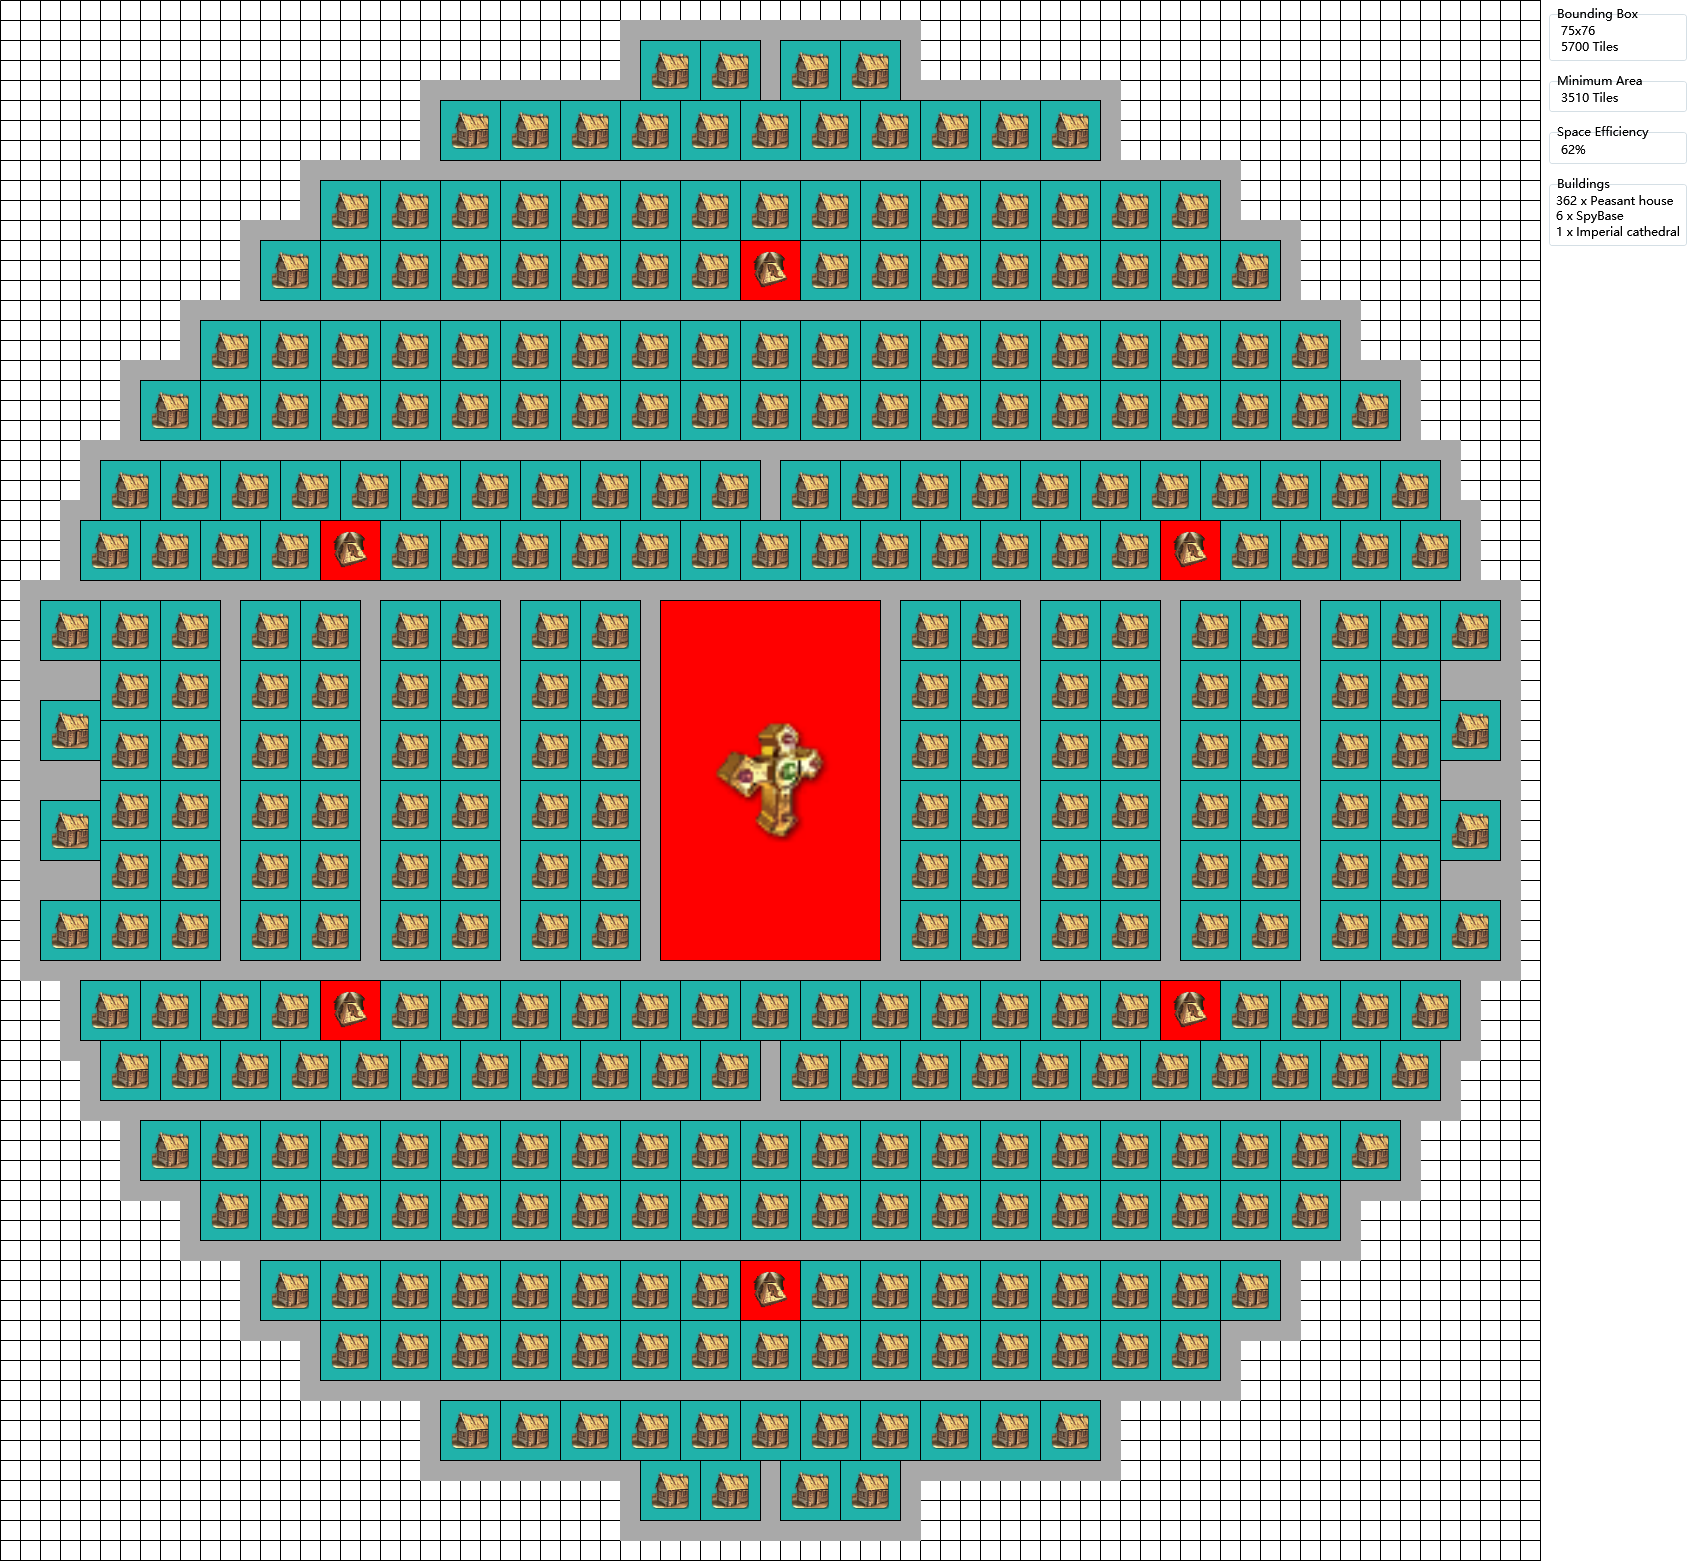
Sultan’s Mosque with houses [ edit | edit source ]
In this picture 6 houses are replaced with Base of Operations. These 6 can cover the whole area.
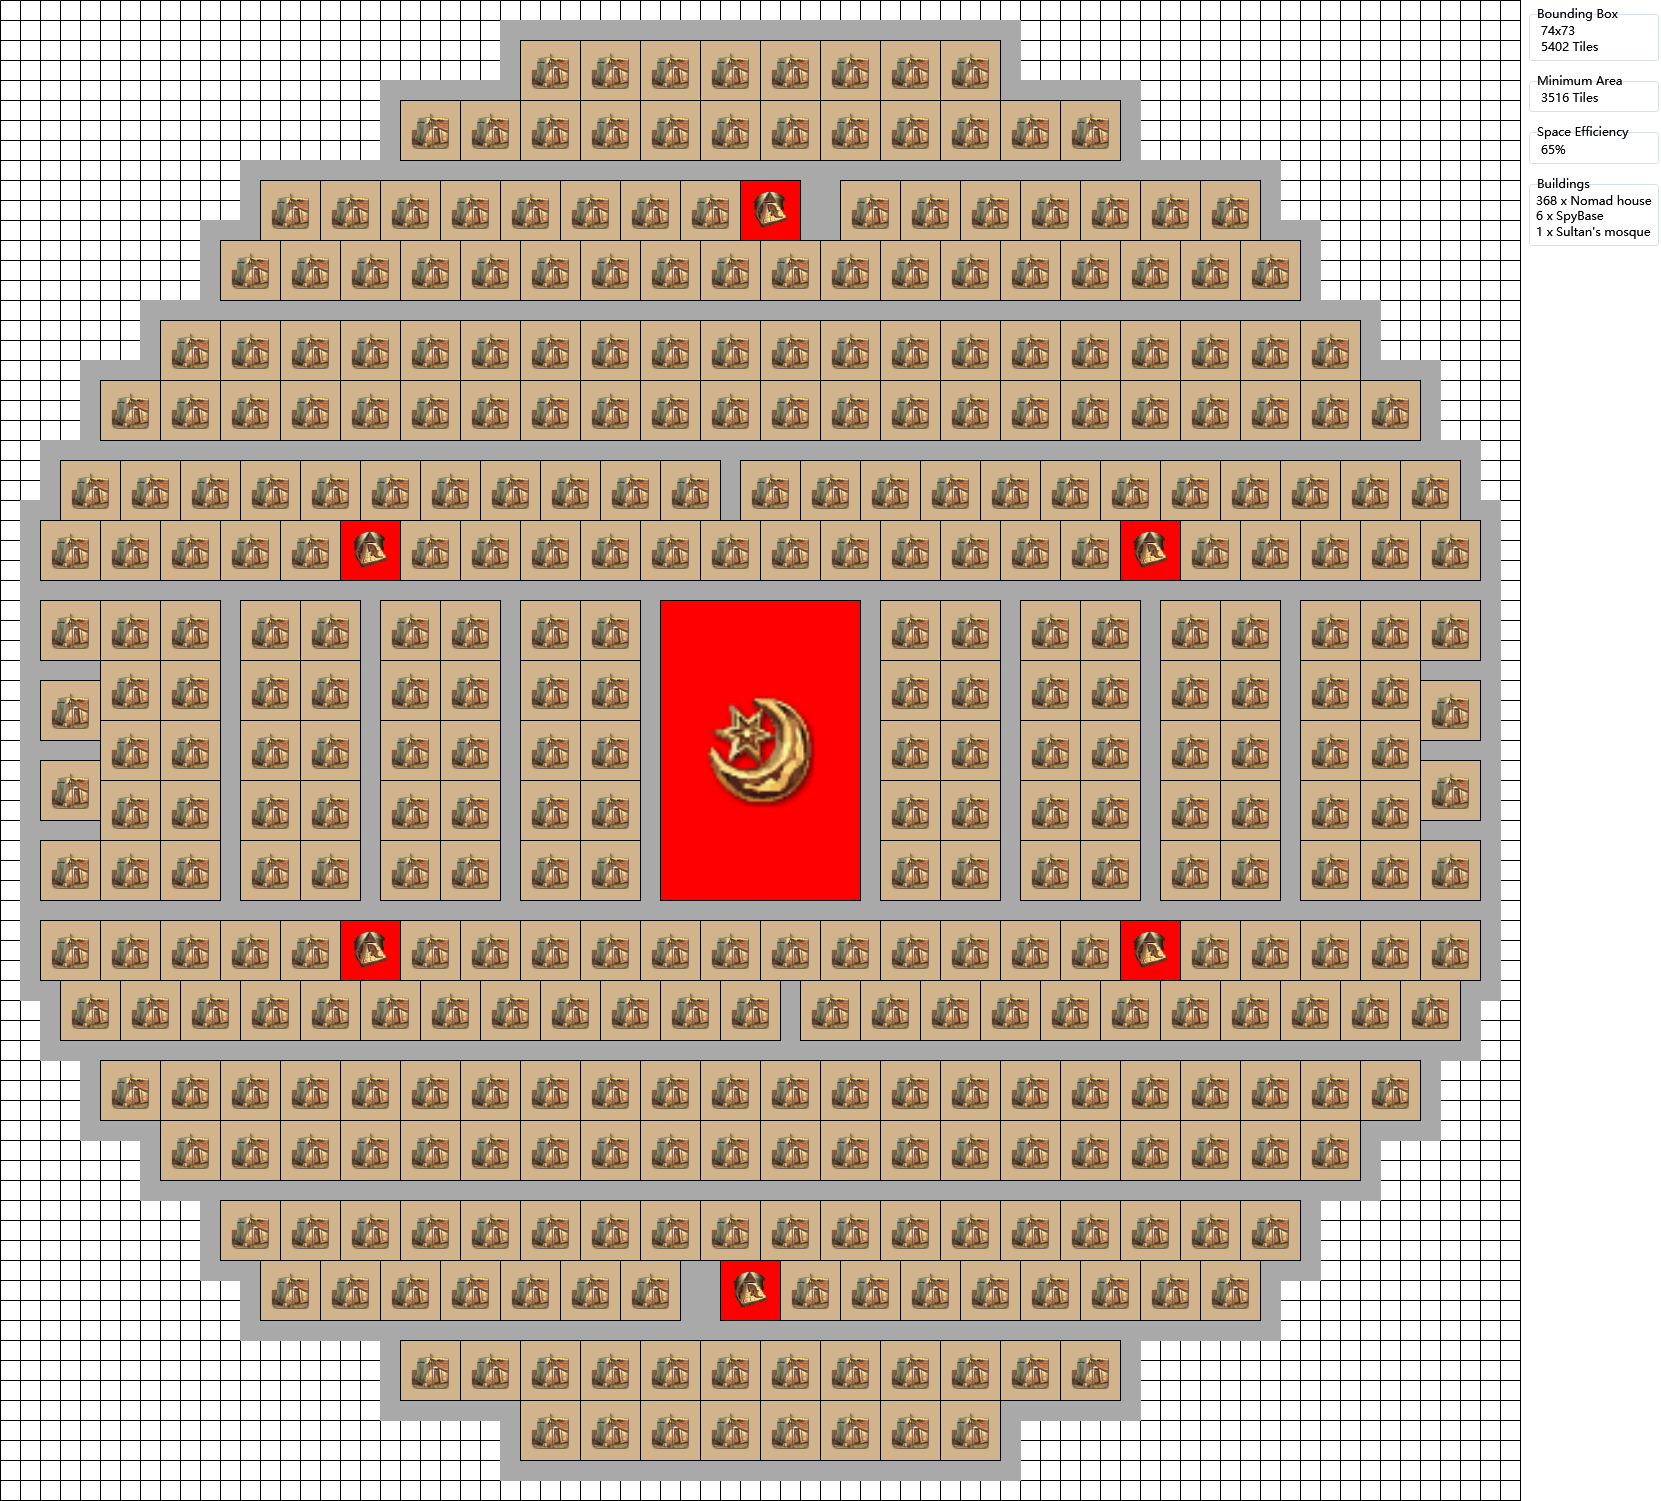
Imperial Cathedral with houses and protection buildings [ edit | edit source ]
The cyan carpenter has only three houses in his area, so you can just place it on a per-need basis.
Also the roads are quite long, so to garantuee fast help, build stone streets or similar.
1 Imperial Cathedral
1 Market Place, how many houses does it fit?
1 Market Place · 100 Houses, or · 96 Houses · 4 Chapels
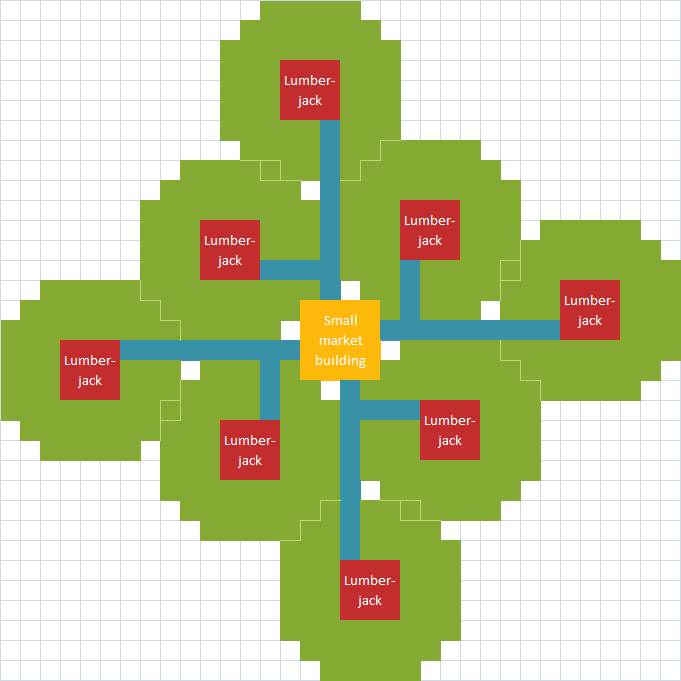
Single production steps [ edit | edit source ]
Even though farms usually do not need a road connection (the next building in the production chain can collect the goods directly), there are advantages to providing road connections.
Placement of 4 rectangle fields (base model) [ edit | edit source ]

Placement of 5 rectangle fields (base model) [ edit | edit source ]
Placement of 4 or 5 rectangle fields (base model) [ edit | edit source ]
Placement of 6 rectangle fields (base model) [ edit | edit source ]
Placement of 8 rectangle fields (base model) [ edit | edit source ]

3% productivity). There is one tile of overlap between each pair of huts.
The small market building can almost completely keep up with production when using dirt roads, and keeps up without trouble if you upgrade to stone roads.
 |

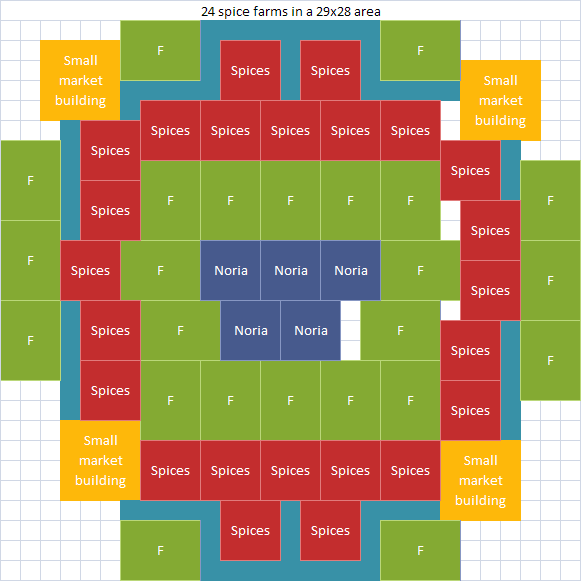
Cider / Hemp / Spices


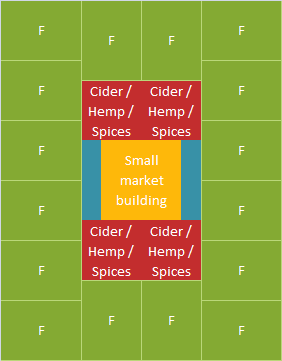
Uses 63 tiles per farm.
If you use this for spices and don’t have (enough) irrigated land, you can either place norias beside the blocks or replace two fields (of different farms) with small norias and use the noria exploit.


You can build farms up to 5 fields. If the farm doesn’t need a road, you don’t need to build the road (red).
In the middle you can build a market building with a small noria, a market building with a process building or 2 process buildings. The choice is yours.
If you build a spice farm you can leave 1 field (yellow) and build a large noria, market building, or process building instead.
Large Norias can also be set at the edge.


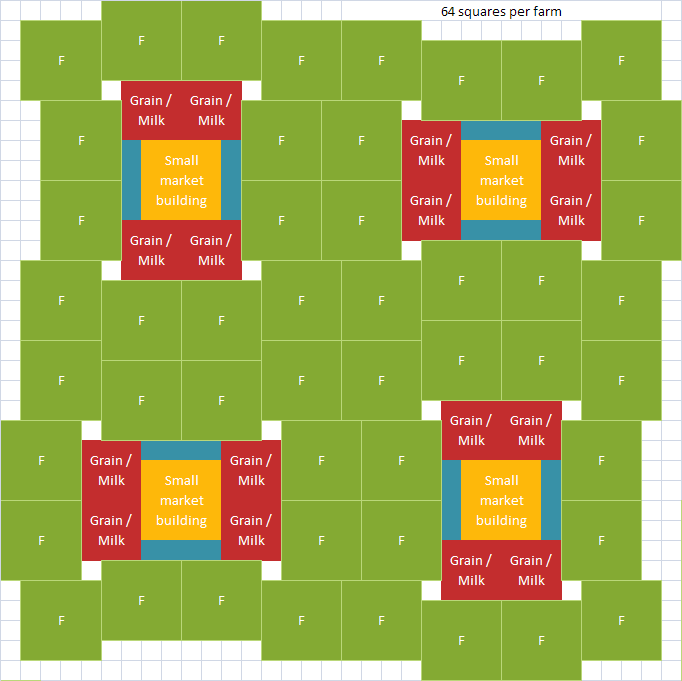
Wheat/Milk farm layout
Uses 64 tiles per farm.
Four blocks are displayed, showing how multiple blocks can be combined without wasting space in between.
Note that since goat farms don’t require any fertilities, you can build them on northern islands. If you’re building goat farms on infertile land, you can either place noria’s beside the blocks, or replace some fields (of different farms) with norias and use the noria exploit.


Uses 37 tiles per farm.
For wheat adequate fertility is also necessary.
Keep in mind that wheat cannot grow on southern islands, and that all these facilities can be built on northern islands. This setup should only be used when you have no more building space left! Otherwise it would be a waste of money, because a noria exploit costs more money in maintenance than a regular farm.
24 milk plantations on 4 norias

Grid Layout of the previous image
Only usable on southern islands with use of noria exploit. 24 goat milk farms with 4 norias run on 100% efficiency.
Be aware that each milk ton produced does drain water from every noria which will noticeably up the cost of milk (due to its low value).
18×16 Milk production with Noria exploit
88% space efficiency
1 x Oriental Warehouse
Total Cost: 6000  63 25
63 25 
Uses Noria exploit, all farms run at 100% efficiency.
Layout must be placed on southern Islands.
This layout can be used for wheat as well for identical results.
Feeds: 3600 Nomads or 4800 Envoys.
Dates / Indigo / Silk / Coffee / Sugar

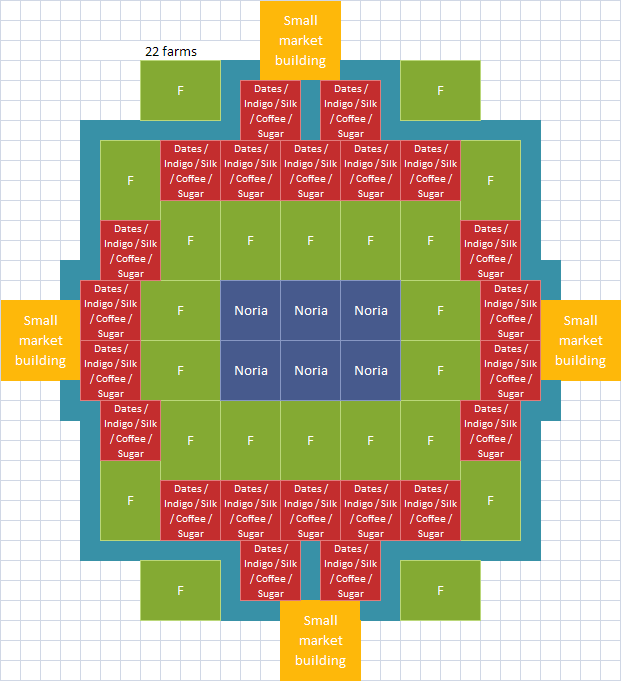
Date/Indigo/Silk/Coffee/Sugar farms with noria exploit
A layout for 22 Date / Indigo / Silk / Coffee / Sugar farms around 6 norias. All farms run at 100% efficiency (see noria exploit).
This layout is not suitable for grapes. [2]
Rectangular Layout for Noria Exploit


Grapes/Dates/Indigo/Silk/Coffee/Sugar farm layout
This layout is usable for grape, date, indigo, silk, coffee and sugar plantations on green soil.
Uses 76.25 tiles per farm.
Four blocks are displayed, showing how to combine multiple blocks while wasting only one tile per block.
Dates / Indigo / Silk / Coffee / Sugar

This layout is usable for date, indigo, silk, coffee and sugar plantations on dry soil including norias. The warehouses on the end of the layout can be used for quarries or other production facilities. On strictly dry soil the farms produce at a reduced rate (91%).
Uses 82.25 tiles per farm, where 69 is theoretical minimum. Does not use the noria exploit.
Four blocks are displayed, showing how to combine multiple blocks while wasting only 3 tiles between «columns».
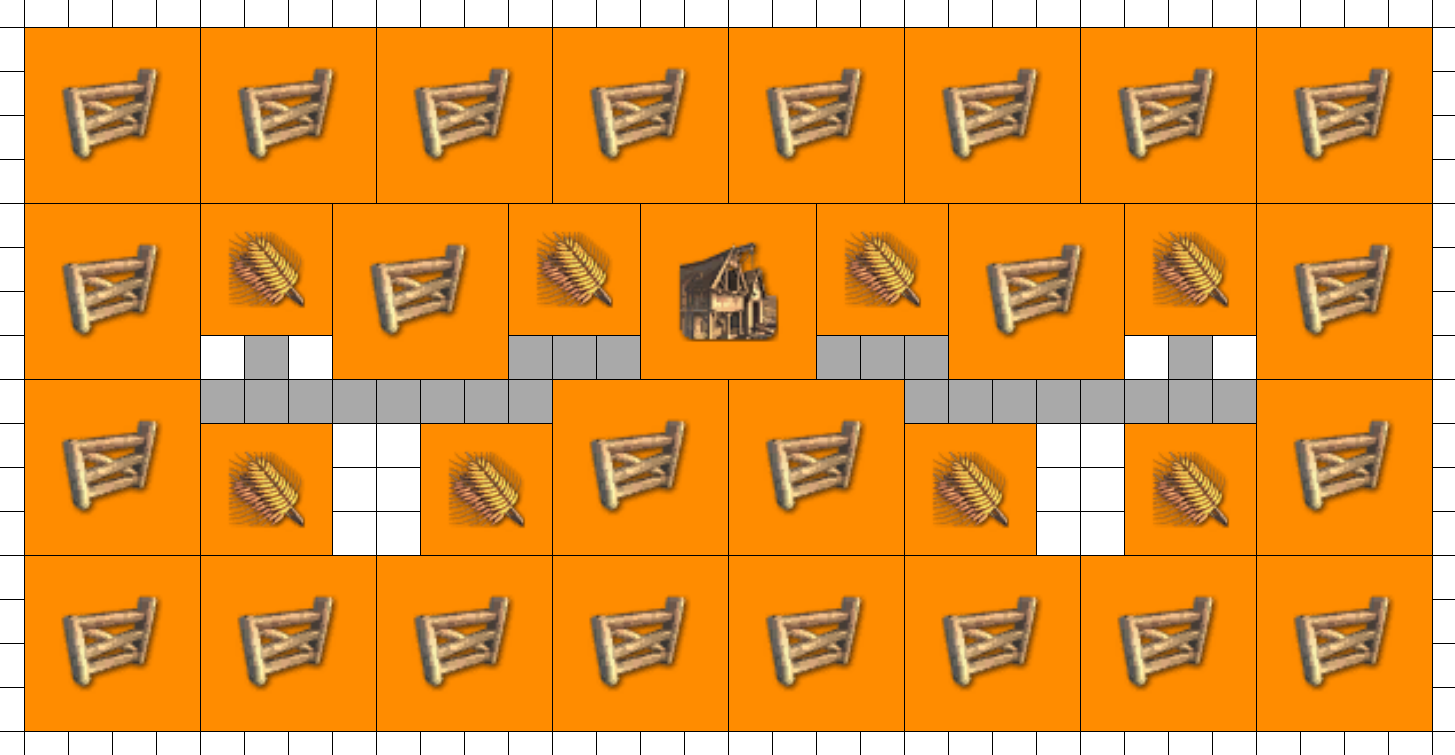
(for beer)

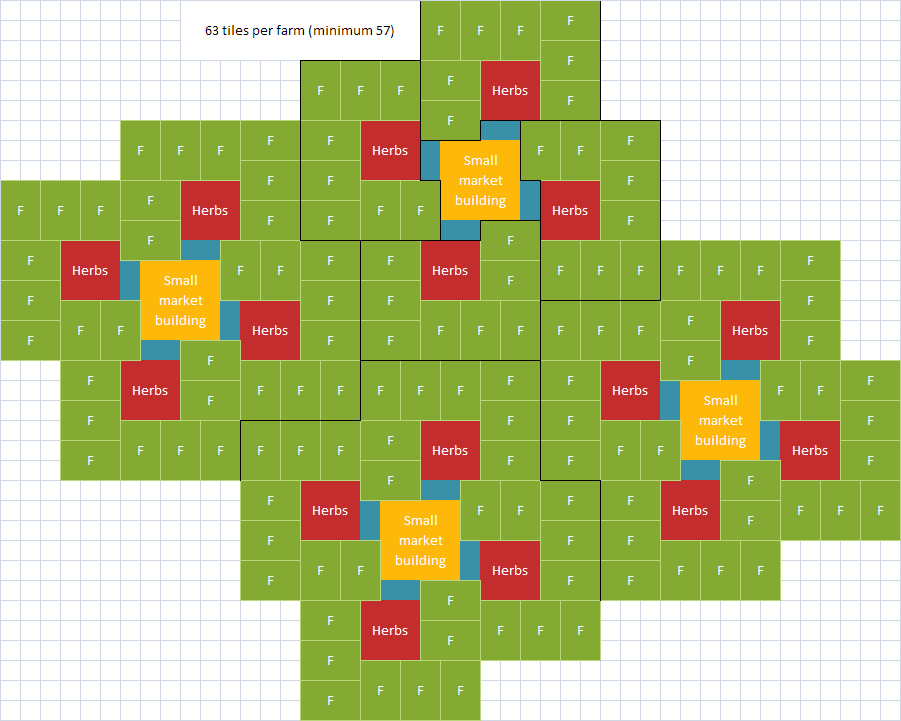
Uses 63 tiles per herb farm, where 57 tiles is the absolute minimum.
Four blocks are displayed, showing how multiple blocks can be combined without wasting space in between.
4 Herbs farm layout
Note that 3 fields are slightly off the monastery radius, but the efficiency is still 100% and you do not need to rebuild the monastery to build the fields.

Three blocks are displayed, showing how multiple blocks can be combined with minimal wasted space in between.
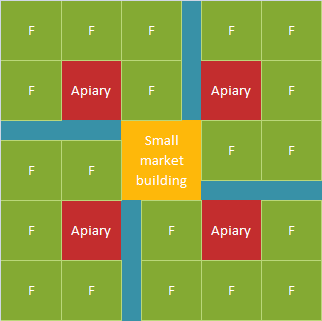
Animal hides
(for leather jerkins) / Cattle Farms (for meat)


Upper layout uses 67.5 tiles per farm where 73 tiles is the absolute minimum without noria exploit. The lower layout uses 60 tiles per farm, but you have to use the field exploit (see below) which will result in higher building costs.
Both layouts work on southern and northern islands. Pig farms run at 100% with 3 norias or 2 norias on dry soil. They will run at 95% with 2 norias on fertile soil.
Cattle farms run at 100% with 3 norias.
There is also space to for other buildings, e.g. process plants.
Cattle farms
(for meat)
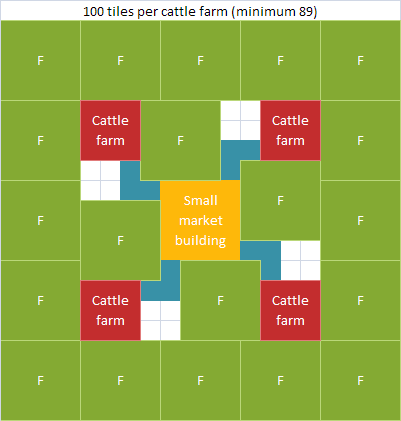
Layout for cattle farms
Uses 100 tiles per cattle farm, where 89 tiles is the absolute minimum.
Cattle farms need five 4×4 fields; pig farms only need four 4×4 fields.

Layout for processing plants
Works for any processing buildings.
Note: keep bakeries and mills well separated if you have many; otherwise they will be tempted to pick up goods directly and waste time taking long walks.
The extended road deadspaces allow some «give» on the corners of the layout. If you barely can’t fit a tight corner (15 tiles, not 16), you can push in a set of beehives along an edge. And since it’s symmetrical, you can do a «mirror image», if needed. The extended road spaces can also let you place factories or whatever at the edge of the configuration, although you may need stone roads or to enlarge the market building so it can keep up.
(for perfume)

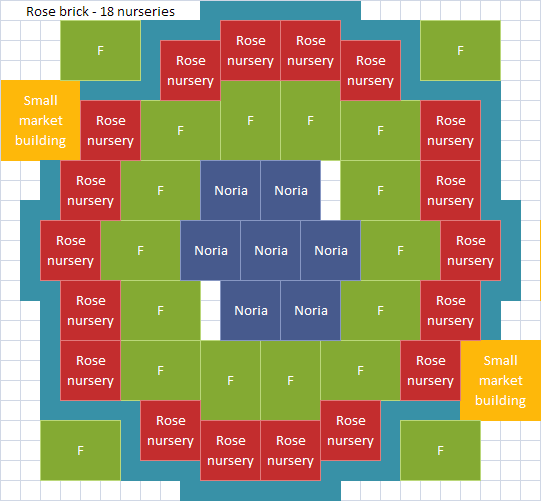
Rose nurseries with noria exploit
A block of 18 rose nurseries supplied by 7 small norias. All nurseries operate at 100% (see noria exploit).
You can place perfumeries along the road if you like.
(for perfume)
Rose nurseries with noria exploit
A perfect 23×23 square of 18 rose nurseries supplied by 7 small norias and 2 market buildings. All nurseries operate at 100% on dry soil (see noria exploit).
This layout uses 29.38 tiles per farm where 21 is the absolute minimum with noria exploit and 81 without.
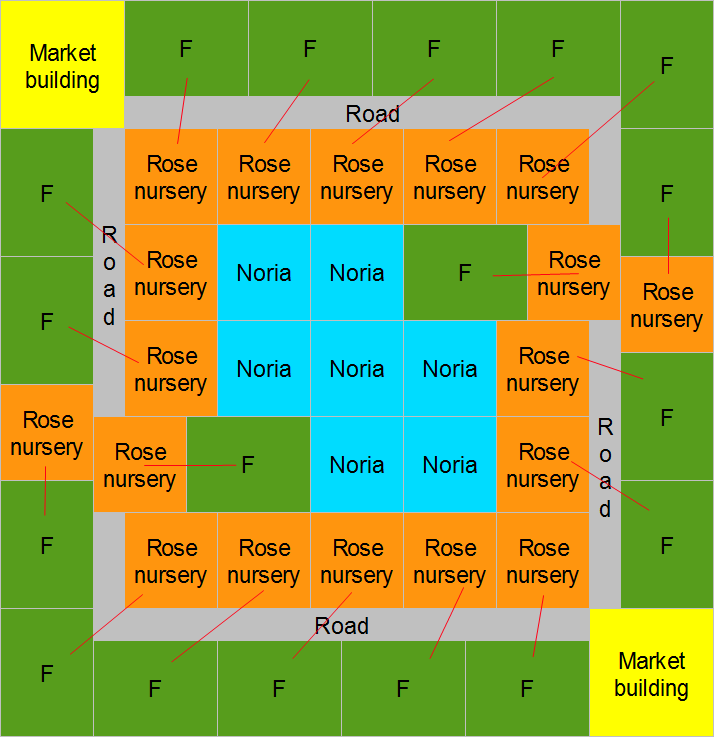
Rose nurseries
(for perfume)

Rose nursery layout
This layout is usable for rose nurseries on fertile soil, or with norias added around it.
Uses 90 tiles per nursery, where 81 tiles is the absolute minimum without using the noria exploit.
This alternative layout allows 1 marketplace to supply 6 rose nurseries in a perfect 18×30 rectangle. May require market building upgrade.
Does not include norias so suitable for fertile soil or with norias added around it.

This layout is used for almonds on fertile soil or with norias around it.
Uses 100 tiles per almond plant, where 89 is the minimum without the noria exploit.

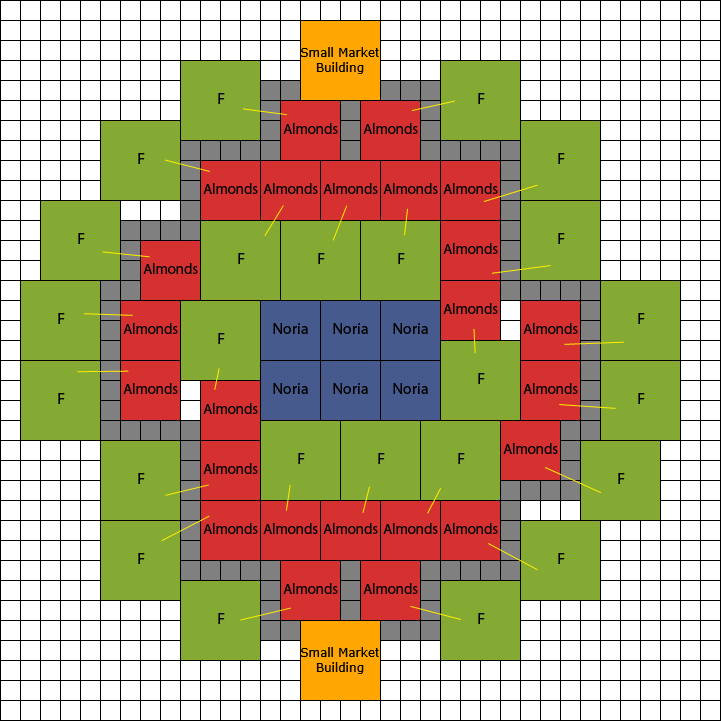
Grid Layout of the previous image
These are 24 almond farms supplied by 6 small norias. All farms operate at 100% (see noria exploit).
Grapes
(small norias)

20 Single-field grape plantations at 100%
This scaleable layout used for 20 single-field grape plantations around 9 norias uses only 2 market buildings. All fields run at 100% capacity using the noria exploit. Uses 30.45 tiles per plantation where 21 is the minimum.
8 Oriental Farm Structure
(eg for 4 carpet workshops)

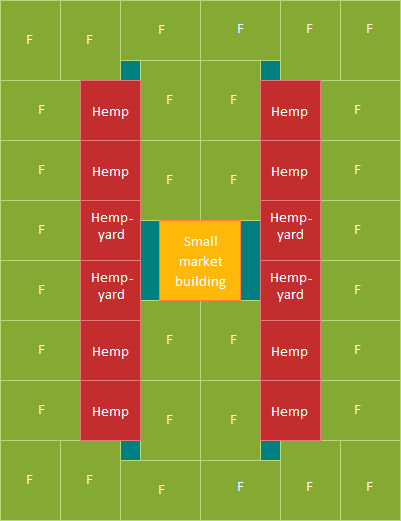
Cider and Hemp with Noria Exploit

The 8 farms on the outskirts, next to the Market buildings with 1 field work at 92% and they would need to be reached by 1 more noria, 7 being the number to raise 1 field from 25 to 100%.

Note: 2 Market Buildings are not necessary, instead the one on edge can be replaced by 4×4 production building(Clay pit).
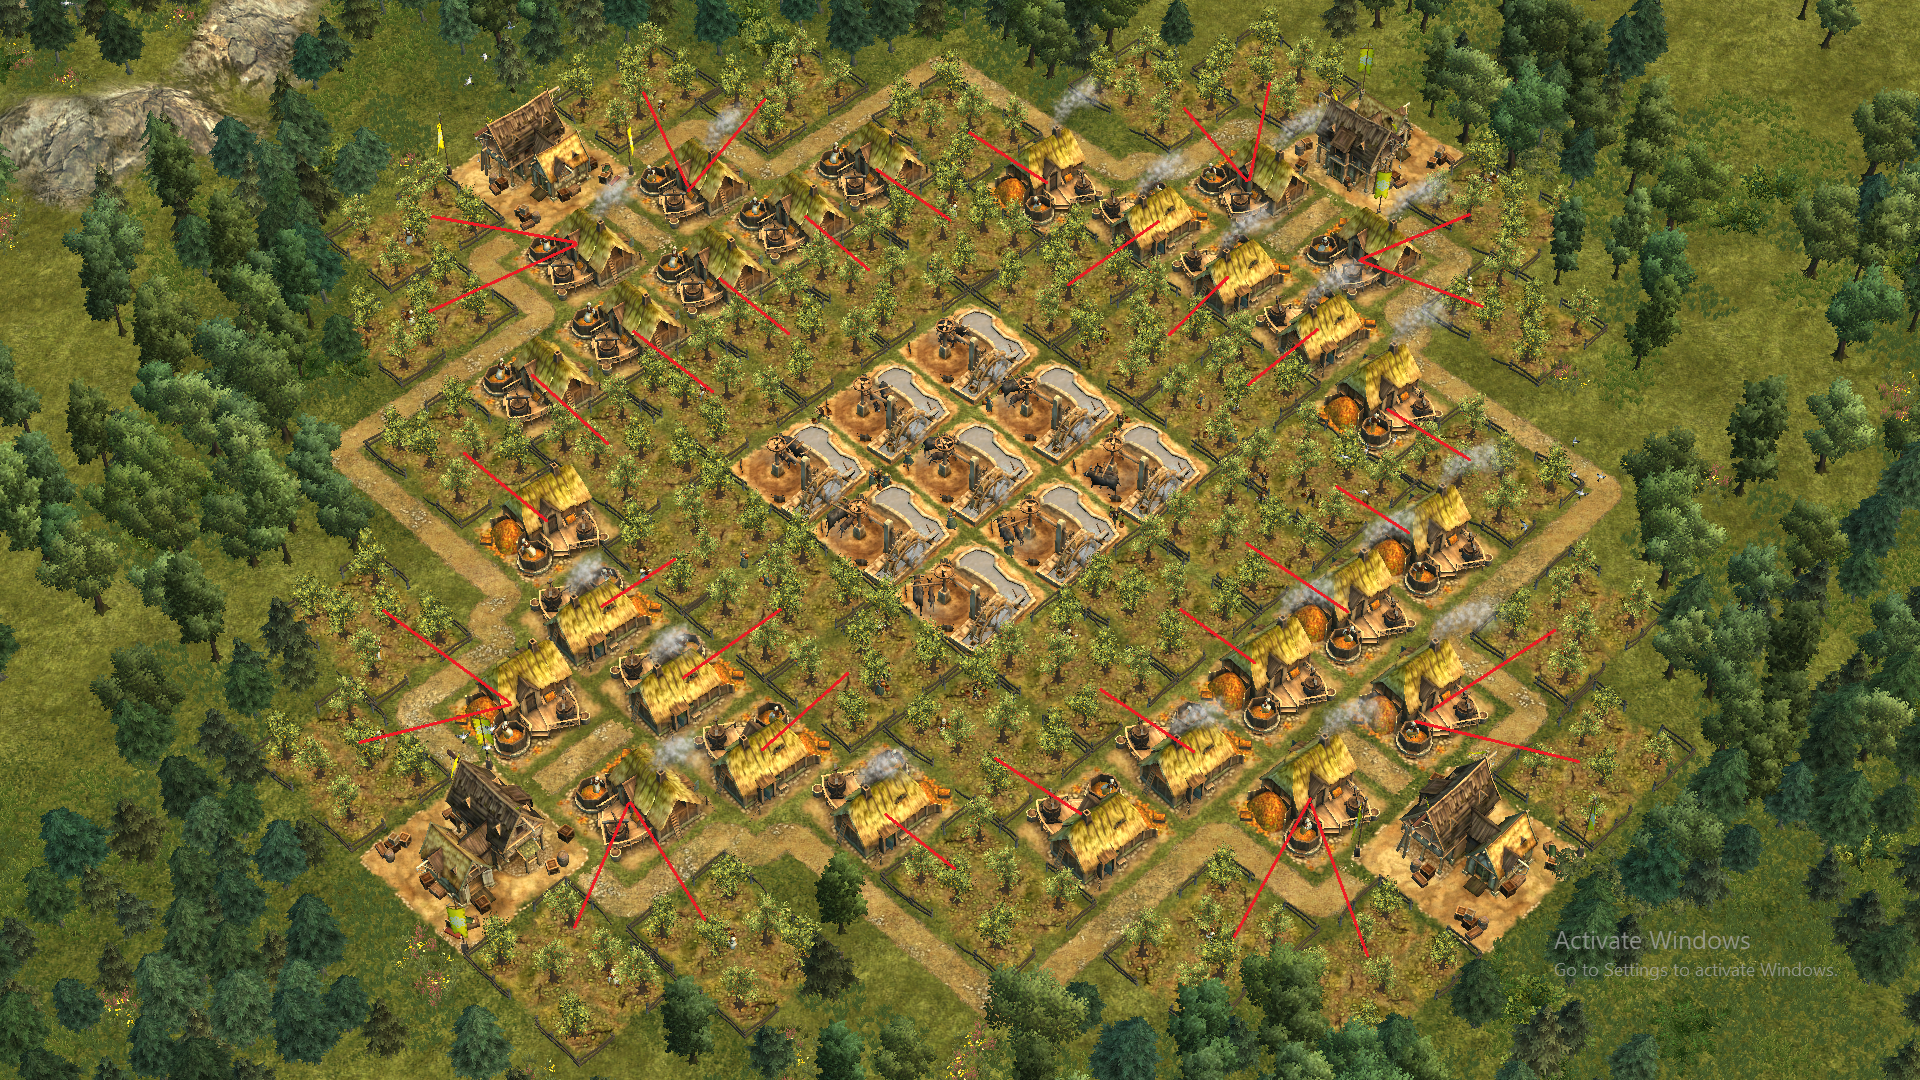
Full production chains [ edit | edit source ]
Creating production chain clusters also has its advantages.
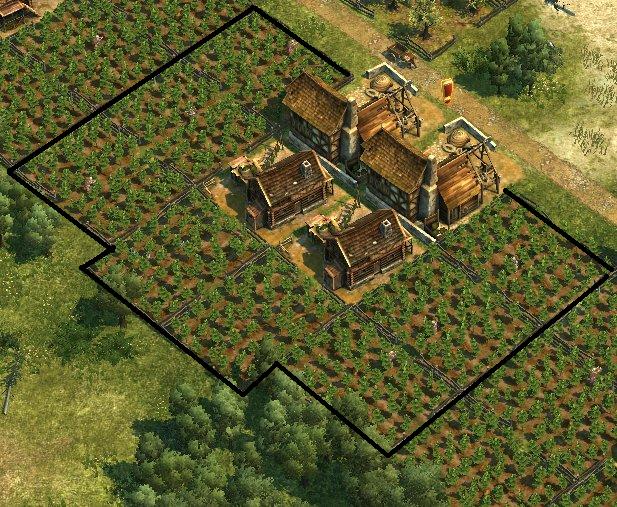
Chee’s Bread Production Loop
As a small variation, you can swap the position of the mill and the wheat farm furthest from the road. This way, you don’t have to destroy and rebuild. All buildings still operate at 100%.

86% Space Efficiency
Modified Chee’s Bread Loop x4
Bread production loop by Agmas

Revised version by Sting_McRay
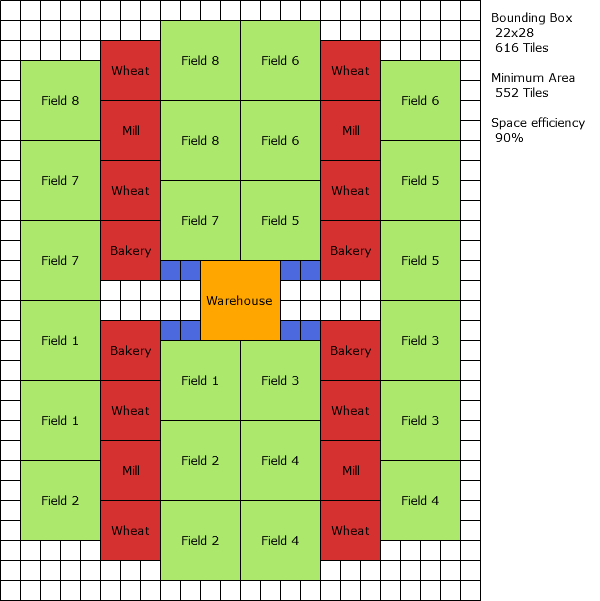
3 Bakeries, 3 Mills and 6 Crop Farms
94% Space Efficiency
Layour for four breweries plus farms
Uses 140 tiles per brewery, where 123 is the theoretical minimum.


86% Space Efficiency
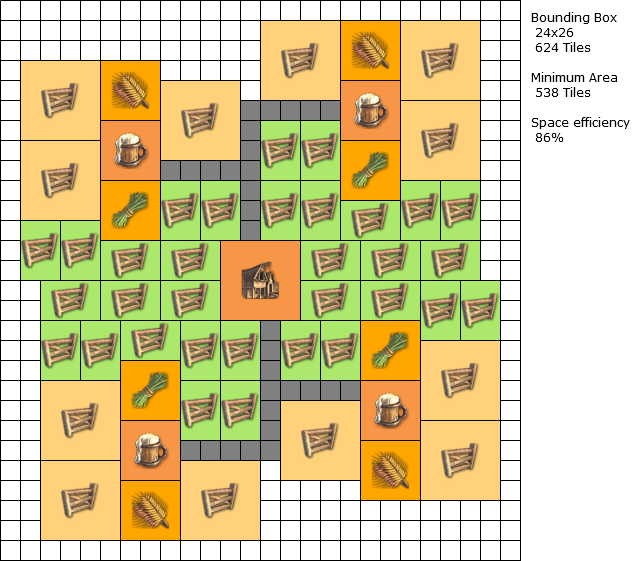
16 x 32 Layout for 4 Beer Production Chains
99% Space Efficiency
Delra’s Coffee layout

Delra’s Rope layout


Magers M.D.’s Linen+ropes Loop
Optional: after advancing to Noblemen stage(when war machines are available to produce), add 1 hemp plantation next to each Ropeyard to make them constantly run at full capacity.
Another rope layout.
4 Linen + 8 farms use 512 tiles on 20х26 rectangle ( 97,7% efficiency )
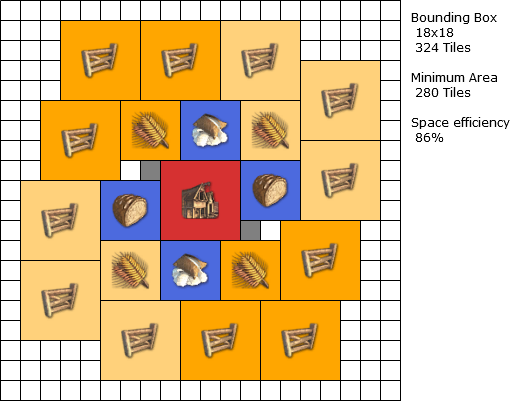
One market place for just 2 wine presses is a little overkill and you could place just one market place in the middle that would be able to get the wine from 4 presses. However, the barrel cooperage would not have a market place in its reach then, so this is the most efficient layout I could come up with. (Wasted tiles are marked with trees.)
Carpets are good to sell for extra money and needed for nomads to advance. Uses noria exploit. 4 Carpet loops are enough for 3600 Nomads or 6000 Envoys.
24×24 layout by Agmas
The corner farms, being further away from the norias, require 3 fields to maintain 100% efficiency.
94% Space Efficiency
23×24 Layout by Agmas
91% Space Efficiency

Four candle chains with 29/30 efficiency.
If you lack space, or need less than four candle chains, you can use half or a quarter of this layout.
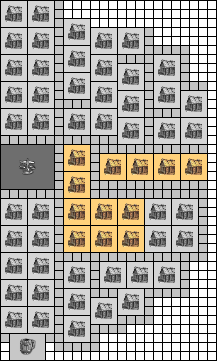
Field Exploit [ edit | edit source ]
Note: the Crop Farm is used as an example below. This strategy works best with fields 4×4 in size!
There are placement options for fields that are just outside the influence area of a building, as shown in the image to the right. However, there is a way to make such placement possible, even though it requires demolishing buildings and incurring extra building costs.
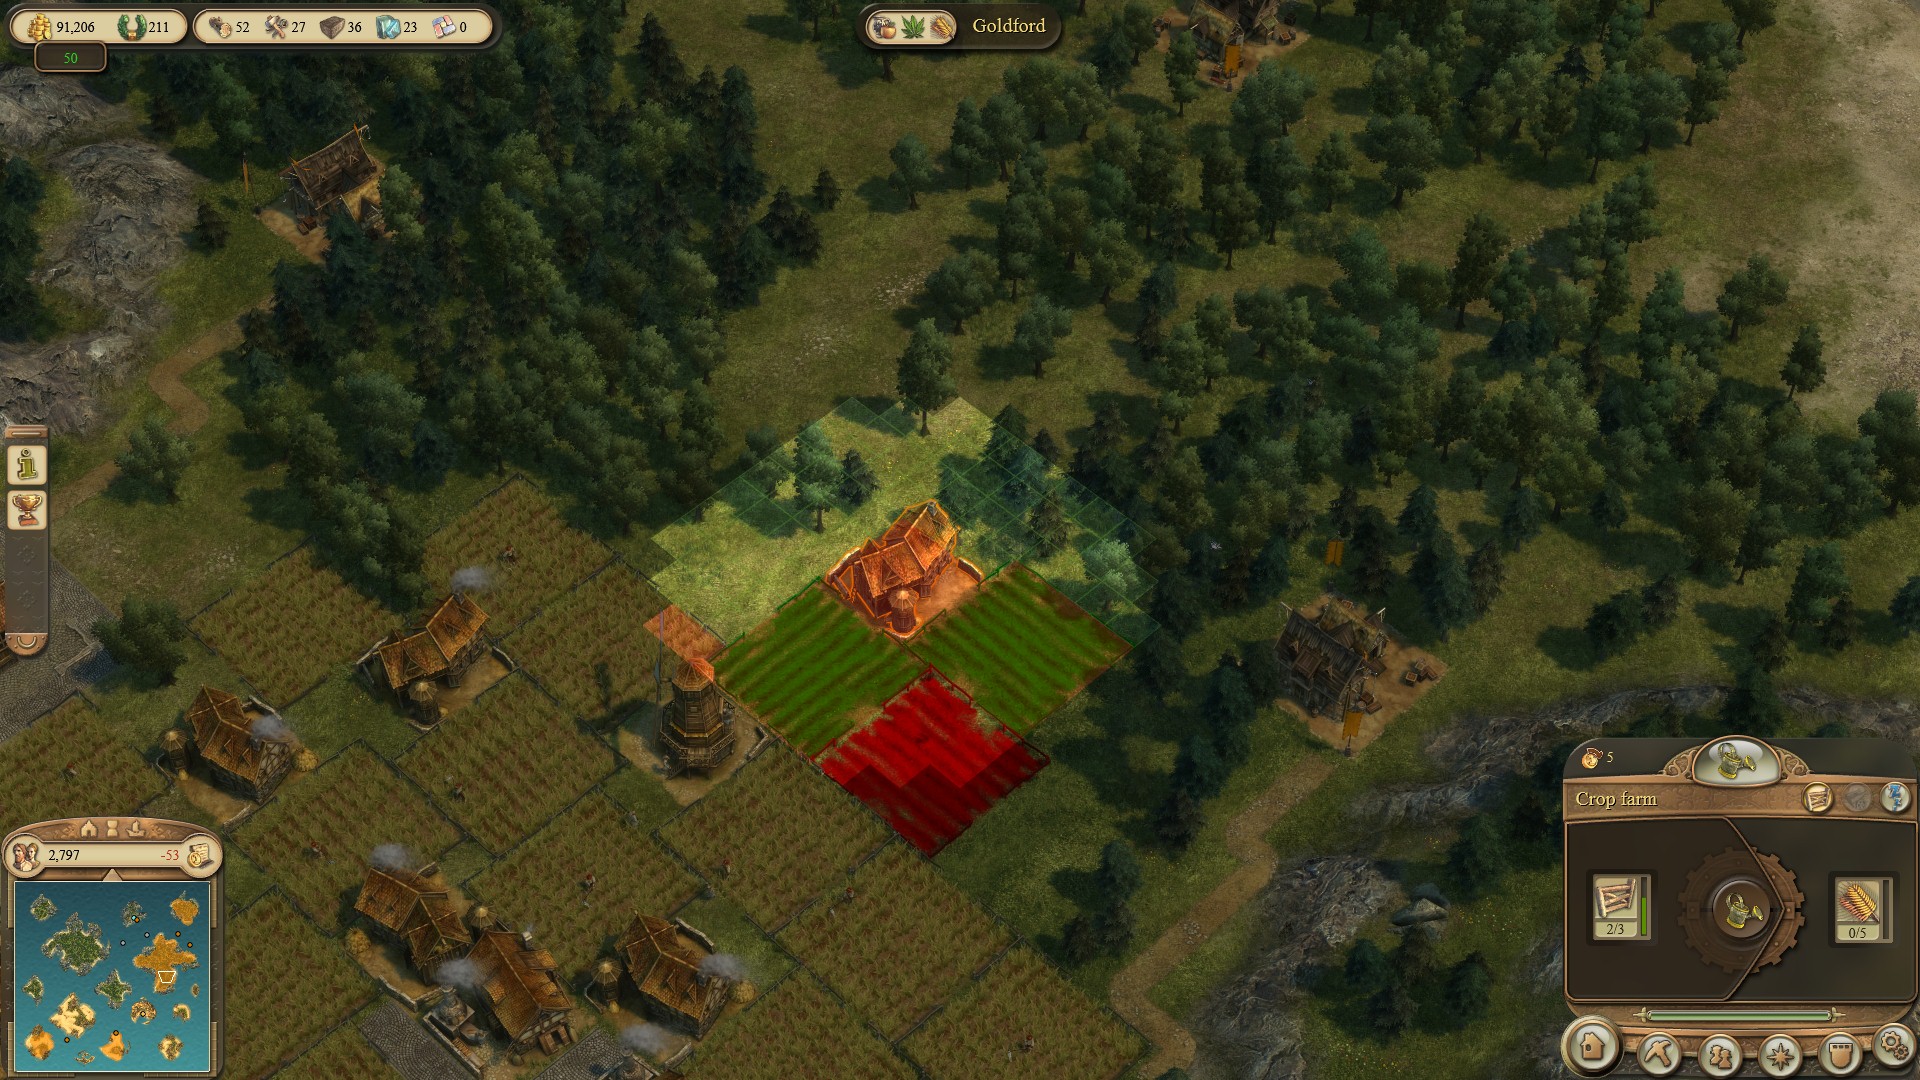
The problem: fields just outside influence area.

Build a new Crop Farm.
First, build a Crop Farm adjacent to the location of the field just outside of the influence area and use this farm to place that required field, as shown in the image to the left. Second, destroy that Crop Farm to release the existing fields from being tied to this Crop Farm.
Now build the permanent Crop Farm and make sure that the required field shows green before placing it. Now place 2 other fields, as shown in the image to the right. Take note that this field is now actually worked by the Crop Farm, in comparison to the first picture. This saves a lot of working space if multiple farms are placed like this!